[2024] How to Select the Snow Throwing Direction
1. When Can We Set and Select the Snow Throwing Direction?
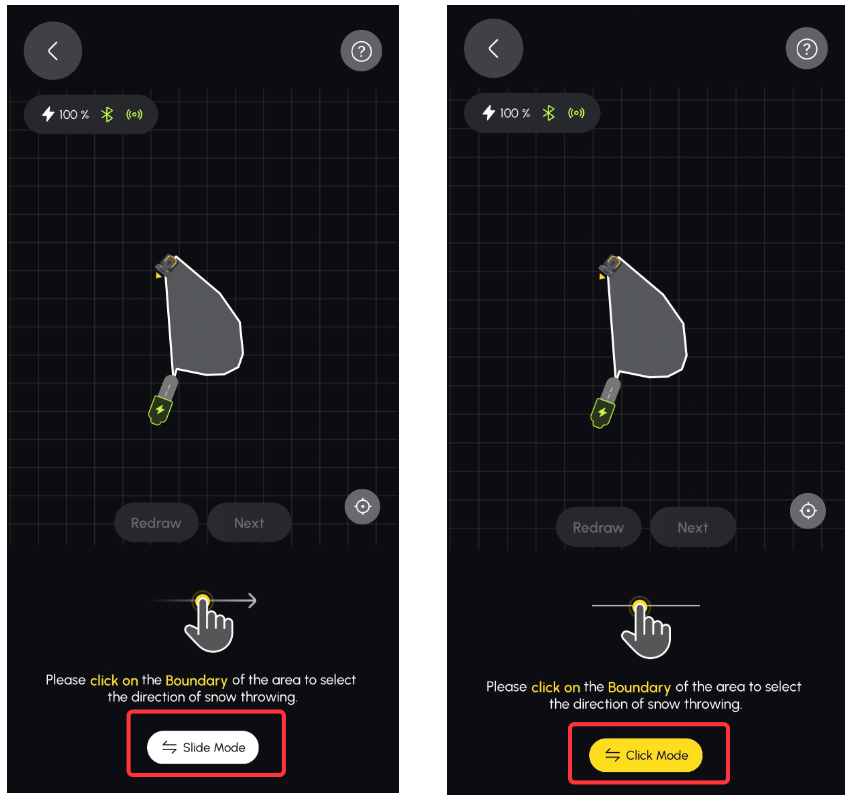
After setting up the Data Center and Docking Station according to the app instructions, you should first draw a Pathway from the Docking Station (serving as the origin) to the Working Area. Once the Working Area is outlined, the app will prompt: “Please click on the Boundary of the area to select the direction of snow throwing.” You can configure the Snow Throwing Direction at this step.
2. Two Methods for Setting the Snow Throwing Direction
We provide two modes for selecting the Snow Throwing Direction: Side Mode and Click Mode, as shown in the red box below:

3. Differences Between Side Mode and Click Mode:
• Side Mode: In this mode, you slide your finger along the boundary of the Working Area. It is recommended for irregular or non-straight boundaries (As shown above on the right border of the working area). Side Mode offers more flexibility for setting the Snow Throwing Direction.
• Click Mode: Click on the boundary of the Working Area. This is often referred to as the “lazy mode.” When the boundary is regular or straight (As shown above on the left border of the working area), you can click on any point along the boundary to select the entire boundary as the Snow Throwing Direction, making the setup simpler and quicker.
4. How to select the Snow Throwing Direction
Once you understand the differences between the two modes, let’s see how to select the Snow Throwing Direction. By default, the app is set to Side Mode. To choose the Snow Throwing Direction, slide your finger along the boundary of the Working Area. We recommend selecting a long, unobstructed boundary line as the Snow Throwing Direction. However, if the long boundary may direct snow into a neighbor’s area, please choose the most optimal Snow Throwing Direction based on your situation.
When you click the Side Mode button, it will switch to Click Mode to set the Snow Throwing Direction. In Click Mode, simply click on a single point along the boundary to select the entire boundary as the Snow Throwing Direction. Once again, we recommend selecting a long, unobstructed boundary line for the Snow Throwing Direction. Please choose the direction that best suits your specific situation.
5. Adjusting the Snow Throwing Direction During Operation
If you find that the selected Snow Throwing Direction needs adjustment while your Yarbo is working, you can easily change it in the app. Simply follow steps 1, 2, 3, 4, and 5 shown in the image below to reconfigure the Snow Throwing Direction.
Related Articles
[2024] Yarbo Snow Blower Quick Start Guide
Please download the attached file for the Quick Start Guide of the 2024 Snow Blower Mower.[2024] Yarbo Snow Blower User Manual
Note: This page is part of our legacy support content. Yarbo’s Knowledge Base has now moved to the new Yarbo Wiki. To access the latest user manual for the Snow Blower and stay up to date with all features and guides, please visit the Yarbo Wiki: ? ...[2024] Yarbo Blower Quick Start Guide
Note: This page is part of our legacy support content. Yarbo’s Knowledge Base has now moved to the new Yarbo Wiki. To access the latest user manual for the Blower and stay up to date with all features and guides, please visit the Yarbo Wiki: ? View ...[2024] Step by Step Guide - Yarbo APP Set Up Tutorial (Yarbo Blower 2024)
Follow our step-by-step guide to set up your Yarbo App and unlock the full potential of your Yarbo devices! Learn more: https://www.yarbo.com/us/2024-series?... 00:03 Choose the Yarbo Blower Module 00:41 Assemble the Data Center 01:16 Initialize Data ...[2024] Yarbo App: New App Page (Yarbo Snow Blower)