Physical Controller Instruction
How to Connect Yarbo Physical Controller
- Before starting, ensure that Yarbo is powered on. A solid yellow light on the Yarbo (shown on following figure) indicates that Yarbo is powered on and ready for the controller setup.Press and hold the Yarbo button.
- Press Logo button to connect the physical controller. Please make sure the yellow light starts flashing (shown on following figure) , indicating that the pairing is ready to begin.
- Wait for 3 to 5 seconds until the light becomes solid yellow and the controller vibrates.
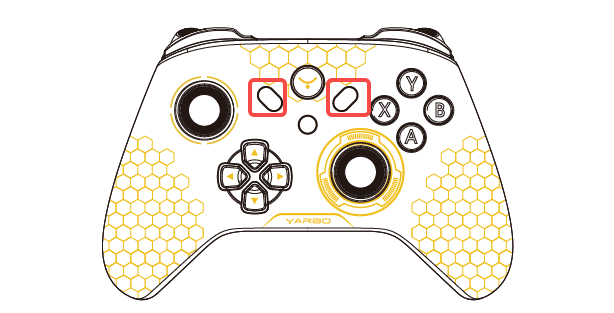
- Press and hold the SELECT button for 3 seconds to start operating Yarbo. Once Yarbo is activated, you can control its movements and start mowing the lawn using the controller.
Turn On the Controller
Gain Authority for Physical Controller
- Press the select or start button for 2 seconds to gain authority for physical controller. Wait for a few seconds for the blade disc initialization.
Adjust the Driving Direction and the Speed of Yarbo
- To Adjust the Driving Direction: Press the RB safety button and move the joystick at the same time to control the yarbo driving direction. Take it slow, and be careful.
- To Adjust the Speed: Press the RB safety button and press the left and right joystick vertically down to switch between two-speed settings.
Start Blade Discs
- Press the RB safety button and LT and RT buttons together to open the cutting disc and users can release one of the buttons (LT or RT) for continuous operatlon.
- Notice:To start the cutting discs three buttons should be pressed at the same time(RB+LT+RT). To maintain the running status, at least one button , either LT or RT should be pressed. RB+LT or RB+RT should be pressed to for continuous operation.
Cut the Lawn
- Remain the RB and one of (LT or RT) pressed. At the same time, control the joystick to cut the lawn.
Adjust the Height of Cutting Disc
- Press the D-pad up and down buttons(up&down arrows) to control the cutting disc height. The left and right buttons have no functions.
Adjust the Angle of the Lawn Mower Module
Pitch Up:
- Press and hold the Y button to continuously pitch up the lawn mower module until it reaches the highest position.
- Release the button to stop at the current angle.
Pitch Down:
- Press and hold the A button to continuously pitch down the lawn mower module until it reaches the lowest position.
- Release the button to stop at the current angle.
Turn On and Off the Lights
- Front Lights: Press the B button to turn on and off the front lights (default setting is on).
- All Lights: Press the X button to turn on or off all the lights (default setting is on).
Exit Error Status
- Error Status Overview: When Yarbo encounters the dangers or stuck by any obstacles, it will stop and enters the error mode.
- Exit Error Status: Press the START button to clear exit the error mode. The controller will vibrate upon successful resolution.
Turn Off the controller
- Turn Off the Controller: Press and hold the "SELECT + B" buttons simultaneously for 2 seconds.