[2024] Yarbo Physical Controller Instructions
Connecting physical controller to Yarbo
Connecting physical controller to mobile phone
Yarbo Controller Holder Installation Guide
Yarbo Physical Controller Instructions
This guide provides detailed instructions on using the Yarbo physical controller to operate Yarbo efficiently. With intuitive controls for speed, snowblower operations, and obstacle management, the controller ensures smooth handling of your Yarbo across different terrains and tasks. Follow these instructions to master the controller and get the most out of your Yarbo.
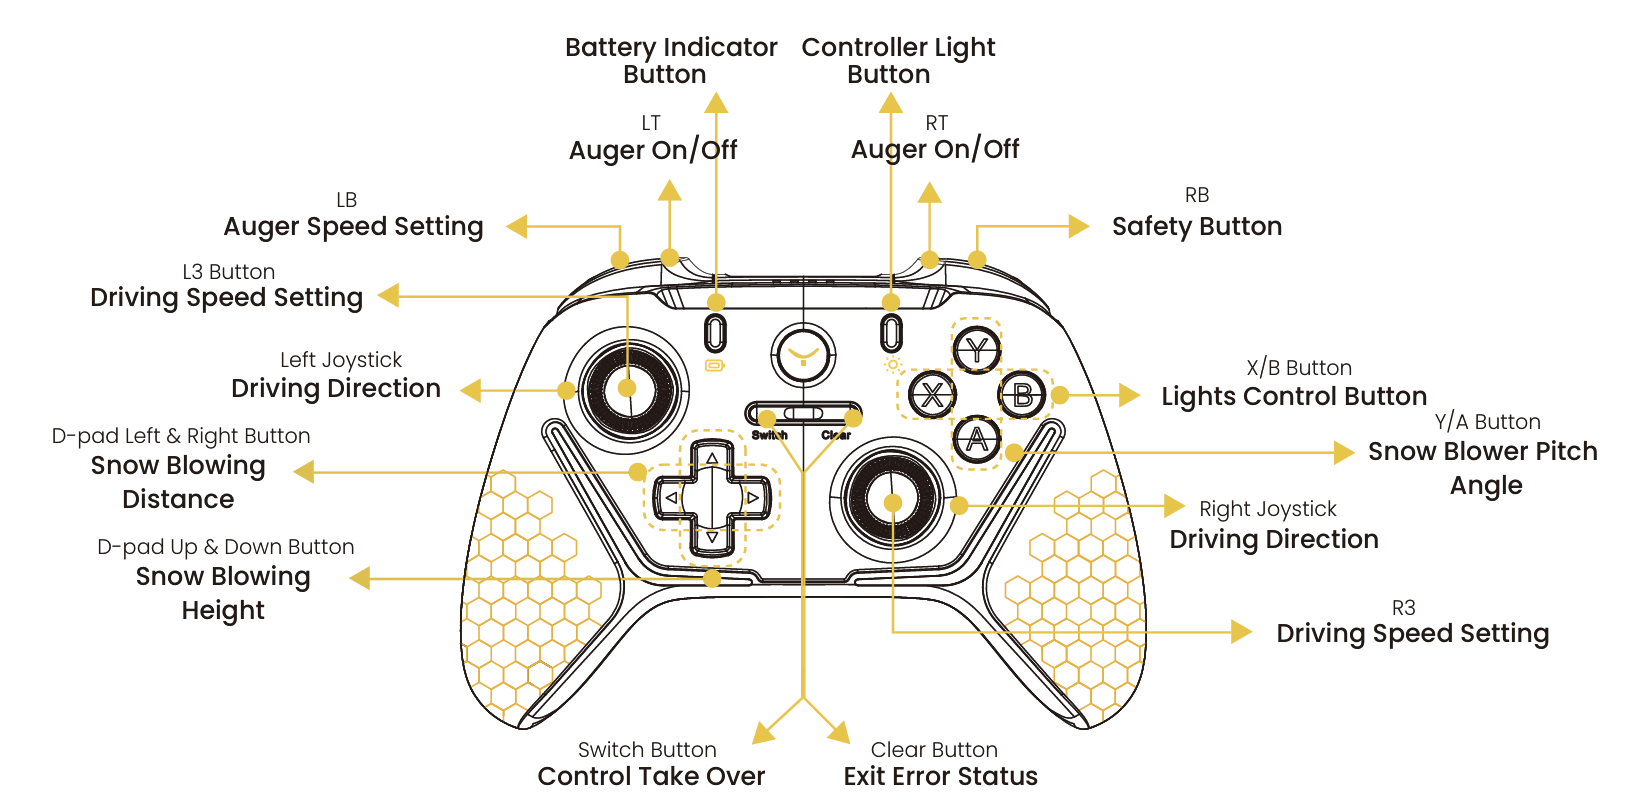
1. Overview of Controller Buttons and Functions
Driving and Speed Controls
- Left Joystick: Controls the driving direction of Yarbo (with safety button RB pressed).
- Right Joystick: Also used to adjust driving direction for more precise maneuvers (with safety button RB pressed).
- L3&R3 Buttons (Press Left&Right Joystick): Adjust Driving Speed.
Snowblower Module Operations
- D-pad Up and Down: Adjust the Snow Blowing Height.
- D-pad Left and Right: Control the Snow Blowing Direction.
- Y/A Button: Set the Snow Blower Pitch Angle
Auger and Blower Controls
- LB Button: Control the Auger Speed Settings for better snow management.
- LT and RT Buttons: Press both LT and RT to start or stop the auger as needed.
Safety and Light Controls
- RB Button: The Safety Button, providing an additional layer of operational security.
- X Button: Lights Control Button to turn on all the lights on yarbo.
- B Button: Head Lights Control Button to turn on the head lights on yarbo.
Control Status and Error Handling
- Switch Button: Control Takeover—use this to switch manual control over to the physical controller.
- Clear Button: Exit Error Status—if the system encounters an error, press this button to clear the status.
Battery and Indicator Controls
- Battery Indicator Button: Check Yarbo’s battery status at any time.
- Controller Light Button: Turn on the controller’s lights for better visibility during night or low-light operations.
2. How to Use the Controller Effectively
- Start the Auger:
- Press both LT and RT to start or stop the auger as needed.
- Adjust the Snow Blower Settings:
- Use the D-pad to adjust the height and distance of the snow blower’s output.
- Press Y/A to set the snowblower pitch angle for more precise snow control.
- Control Yarbo’s Driving Direction:
- Use the Left or Right Joystick to steer Yarbo smoothly along the driveway or pathways.
- Change Driving Speed:
- Press L3 or R3 to access the speed settings menu and adjust Yarbo’s speed based on your needs.
- Enable Safety Features:
- Only when the RB button is pressed can the unit be controlled for walking.
- Take Control and Resolve Errors:
- Press the Switch Button to take over control access from App controller.
- Use the Clear Button to exit any error status and resume operation quickly.
Related Articles
[2024] Physical Controller Instructions for Lawn Mower
Physical Controller Instructions for 2024 Lawn Mower This guide offers instructions on using the Yarbo physical controller to operate your Yarbo lawn mower with maximum efficiency. Featuring intuitive controls for speed, mower operations, and other ...[2024] Yarbo User Manual
This page is part of Yarbo’s legacy support content. We’ve launched a new and improved Yarbo Wiki where you’ll find the most up-to-date product guides, FAQs, troubleshooting tips, and user manuals. ? Visit the Yarbo Wiki to explore the latest ...[2024] Yarbo User Manual
This section outlines: Part I – Safety & Introduction Part II – Setup Guide of Data Center, Docking Station & Yarbo Core Part III – Setup Guide of Snow Blower Part IV – Setup Guide of Plow Blade Part V - Removing Skid Shoes, Anti-slip Studs, Snow ...[2024] Yarbo User Manual
This section outlines: Part I – Safety & Introduction Part II – Setup Guide of Data Center, Docking Station & Yarbo Core Part III – Setup Guide of Snow Blower Part IV – Setup Guide of Plow Blade Part V - Removing Skid Shoes, Anti-slip Studs, Snow ...[2024] Yarbo App Controller Features Guide
The Yarbo App Controller gives you full control over your Yarbo and allows you to operate it conveniently using your mobile device. Understanding each button and function is key to maximizing Yarbo's efficiency. Let’s dive into the features and how ...